Showing posts with label raw. Show all posts

Sunday, 21 August 2016

Raw Cake: Vanilla Strawberry-Raspberry Cheesecake

Happy August everyone! Having been back in Amsterdam for 2 weeks already I must say I really miss the gorgeous summer weather back in Toronto. It's been cloudy, raining and on top of all this a super chilly August in Amsterdam. Leaving home this time was quite difficult. Having spent a whole month with my parents at home made it that much harder to leave them behind. I felt quite homesick coming back, and so I decided to cheer myself up by making something incredibly delicious.

Now I originally wanted to bake something super sweet, and indulgent as usual but having just been on summer vacation and not particularly watching what I've been eating... (aka junk food) I thought I should try to keep it healthy. Thats when the idea of making a raw cheesecake came into mind. I have seen several gorgeous raw cakes on Instagram and it has inspired me to make my own. I have once before attempted to these raw cakes... but let me tell you these cakes are seriously tough however they are very well worth the work. Now I don't want you to think that these cakes taste like the conventional "Cheesecake" the ones filled with cream cheese, butter, and eggs. I love those cheesecakes too but this cheesecake that I am going to share with you is more of a work of art that also benefits your health and tastes amazing at the same time.


Now that I've decided to go with a raw cheesecake it took me quite sometime to figure out the flavour of this little guy. I had made a Matcha Vanilla cheesecake before, but this time my boyfriend had kindly requested a fruity flavour since it is still summer. And since there were some fresh strawberries  and frozen raspberries in the fridge I went with those. I love the double layered raw cakes because of the beautiful colours each layer brought to the cake, so I decided to make the second layer a "Vanilla Cream" layer.


The structure of the cake starts off with the Base. The normal crust of a traditional cheesecake usually contains a "Graham Cracker and butter" crust. For the raw, healthy version I decided to go with a mixture of almonds, walnuts, and dates. So instead of filling our bodies with trans-fats and refined sugars, I went with the heart healthy monounsaturated fats, and natural sugars from the nuts and dates.

Now just so we are clear I won't be using any cream cheese, or dairy products in this cheesecake. The cream cheese is substituted with soaked cashews, maple syrup, lemon juice, fresh strawberries, and raspberries. These ingredients make up the first layer of the cake. As for the last layer, the Vanilla Cream, it is primarily made up of soaked cashews, vanilla powder, agave syrup, and lemon juice.

...

The ingredients are quite similar between the two layer, however one contains fruits, and the other is mainly just a simple cream layer. Along with that I used two different types of sweeteners. For the Strawberry-Raspberry layer I used Maple Syrup because it will add a really nice flavour for the fruit layer of the cheesecake. For the Vanilla Cream I wanted a more creamy consistency so I went with Agave Syrup, which is less runny and will help to achieve the creamy consistency. Now that you know whats going into this cake I think you would agree that this cake is even healthy enough for breakfast. (hahaha says the person who is trying to be healthy...)

Ok ok... so we know that this cake is healthy, gluten free, dairy free, vegan, and raw but how do we actually make it? haha... here we go!


Ingredients:

Base:

100g Almonds
35g Walnuts
100g Dates

Strawberry-Raspberry Layer:

200g Raw Cashews
150g Strawberry
50g Raspberry
2 Tbsp Lemon Juice
3 Tbsp Maple Syrup

Vanilla Cream Layer:

100g Raw Cashews
3 Tbsp Agave Syrup
2 Tbsp Lemon Juice
1 Tsp Vanilla Powder
1-2 Tbsp Water (Optional)

Directions:


Before we start make sure you...

* Measure out 200g of Raw Cashews and soak this in water overnight/6 hours or more.
(Strawberry-Raspberry Layer)

* Measure out 100g of Raw Cashews and soak this in water overnight/6 hours or more.
(Vanilla Cream Layer)

                                                                                 ...

1. First off I used a square springform pan of 6 inches by 6 inches/15cm x15 cm.

(You can also use a round springform pan if you wish... just keep the size close to this one and it should be fine.)

I begin by taking a large piece of parchment paper and roughly cut out a square piece that was around the size of this pan and placed it at the bottom to prevent sticking and allowing the cake to come out easier serving.


2. Now we are starting the cake from the bottom the Base Layer. For this layer I measured out 100g of Almonds, 35g of Walnuts, and placed these two ingredients into the food processor. I found it to be much better to first process the nuts alone before adding in the dates. Process the nuts until they resemble a crumb like consistency.


3. Now that the nuts are blended up you can add in your 100g of Dates and process the nuts and dates together. *I used some Deglet Nour dates here which are much more affordable than the Medjoul Dates. Feel free to use what you prefer. I found that soaking them in some warm water for 30 minutes really help them to soften up and they blend up much better this way. (Just remember to drain the water out completely after soaking) 

Process the nuts and dates till it reaches a doughy consistency. (So basically when the dates are well incorporated with the nuts and it starts to form a sticky ball)


4. Once you have your sticky nut & date dough press this into the bottom of the spring pan. This part is super fun because you get to use your fingers! It's kinda like playing with play dough! Just try to press it down flat. This forms the crust of our cakes. Now place this into the freezer to set.

5.  While we wait for the Base to set. We are gonna move onto the Strawberry-Raspberry Layer. For this layer I used 150g of fresh Strawberries, 50g of frozen Raspberries (that I defrosted), 2 Tbsp of Lemon Juice, and 2 Tbsp of Maple Syrup. I placed all these ingredients into a food processor and blended it together till everything was smooth.


* Now if you prefer to having a super smooth consistency for your cheesecake then I would recommend taking a fine sieve and straining out the seeds of the strawberries and raspberries. But I personally really love the texture that they bring to the cake so I kept them. 
...

6. Continuing with this layer take the 200g of soaked Cashews, and drain the water out and place this into your blender. Along with the cashews place the Strawberry-Raspberry sauce we just made along with 1 Tbsp of Maple Syrup and blend this together until it becomes smooth and there are no clumps.


7.  Now take out the Base Layer we made earlier from the freezer and spread this mixture of Strawberry-Raspberry Cream onto the base. I used a rubber spatula to smooth out the top of the layer. Place this back into the freezer to set.


8. The final Layer! Our Vanilla Cream. So for this layer I took 100g of soaked Cashews, 2 Tbsp of Lemon Juice, 3 Tbsp Agave Syrup, 1 Tsp Vanilla Powder, and placed these ingredients into the blender.

* I would recommend if your having troubles blending this mixture to add in a tiny spoonful of water just to help the mixture blend. Again we want to reach a very smooth and creamy consistency. 


9. Now take out the pan with the previous two layers we have made from the freezer and spread this Vanilla Cream over top of the Strawberry-Raspberry layer and smooth out the top. Place this back into the freezer and let the cake set for at least 2 hours before attempting to eat it. This is the really hard part! Hehe!

                                                                               ...

So once it has been about 2 hours take your cake out of the freezer and let it sit on the counter for 15-20 minutes. This will assure that your cake comes out of the pan in one piece. I usually place a large cup under the cake tin and push upwards to slide the cake out.


And now you can decorate your cake with anything you can imagine! I just sliced up some fresh strawberries and placed them right on top of my cheesecake.


I made approximately 7-8 slices of cake with this recipe, but its all up to the size of the pan you use, and also how you cut them. The left over pieces I keep stored away in the freezer. When I want to eat it I usually leave it out on the counter for around 30 minutes, or if you know you want to eat it for dessert on the night of, you can always leave the cake in the fridge on the morning of, and by dinner time it should be ready to eat straight out of the fridge! It is a bit of work to make this raw cake but I feel super satisfied and very proud to make something super beautiful and delicious yet extremely high in nutritional benefits! I hope you all will give this a try!!! Stay happy and healthy.

xoxo
Coco


Tuesday, 21 June 2016

Birthday Treats: Raw Chocolate Caramel Slices

Hello everyone!

Its June and even though the weather in Amsterdam isn't the most sunny at the moment I can't help but smile knowing that it's one of my favourite times of the year. I do have to say I am exhausted, the season at the Dutch National Ballet is coming to an end with only 5 more working days left and with 4 more performances in our last program "Transatlantic". I have had an adventurous season and have learned lots, and developed in ways of dancing and in everyday life. I am very happy and grateful for all the kindness that have been shown to me. With the end of the season being quite demanding both physically and mentally my body has asked numerous of time for some sweet treats, and of course how could I refuse myself of chocolate, and cake? It is the month of my birthday, and why not?!


On the day of my birthday I didn't really have the time to celebrate with stage rehearsals all day and night. So naturally I decided to scroll through both Instagram and Pinterest and find anything that I fancied... and truth be told I wrote down about 5 different choices. As of now I have already made 2 out of these 5 desserts, and I think I will make my way through them all eventually... but there is one that I must absolutely share with everyone... this is probably going to be one of my all time favourites for a very long time.


I don't remember why I almost started drooling when I saw this picture (probably because there was chocolate), I was literally almost late for a rehearsal because I was so excited and determined to make this for my birthday. I believe the picture of this dessert was floating about on Instagram, Im not a hundred percent sure which account, but it was beautiful. It was a Triple Layer Chocolate Caramel Slice... Ok if this doesn't make much sense, (so the first layer the Base, then the Caramel, and finally the Chocolate). Now what made this so exciting for me was because I wanted to figure out a way to make this recipe healthy... so that I could eat it for breakfast if I wanted, hahaha chocolate for breakfast YES PLEASE!


It took a bit of research, trial and error, but finally I can share my favourite version of these scrumptiously healthy chocolate treats. Did I mention its Raw, Vegan, Gluten Free, and most importantly super delicious. These slices won't be spiking blood sugars, in fact most of the sugar in this recipe comes from dates. So yup its super healthy, and will give you plenty of energy and happiness.

So lets get into the recipe!

Ingredients:

Base:
-1 cup Cashews
-1/3 cup Shredded Coconut
- 3/4 cup Soaked Dates
- Pinch of Sea Salt

Caramel:
-1 cup Soaked Dates
-3 Tbsp Coconut Oil
-3 Tbsp Tahini
-1/2 Tsp Vanilla Powder
- Pinch of Sea Salt

Chocolate:
- 3 Tbsp Cacao Powder
- 2 Tbsp Coconut Oil
- 3 Tbsp Maple Syrup
- 1 Tsp Carob Powder
- 1 Tsp Cacao Nibs (for sprinkling on top)

Directions:

1. Place the cashews and shredded coconut together into the food processor and process roughly together.
2. Drain the soaked dates (Don't throw away the date water, use it as a sweetener for other recipes) and add it along with a pinch of sea salt in the food processor along with the cashew and coconut and give it a few pulses until combined.
3. Press the dough into a lined square tin, (Mine is 23 cm (9") and place into the freezer to set.


4. For the Caramel place all ingredients into the food processor and blend until smooth. Spread this mixture evenly over the Base you just made, and place this back into the freezer.
5. Next for the Chocolate, melt the coconut oil, and add in the maple syrup. The heat should be quite low.
6. Whisk in the cacao powder and the carob powder. Keep whisking till the cacao and carob have dissolved into the mixture.
7. Now drizzle the Chocolate over the Caramel layer and sprinkle on the cacao nibs.
8. Cover with a plastic wrap and place into the freezer. This should set and be ready in less than an hour.

* If you don't like Cashew Nuts feel free to swap it with Almonds, or Walnuts, even Pecans would work very well.

* If you don't like Tahini, Almond butter, or Cashew butter, even Peanut butter would work too. (I personally love what the Tahini brings to this recipe)

* For the Chocolate remember to keep the heat of the saucepan on low and keep whisking to prevent it from burning.


So after waiting about an hour or so take it out of the freezer and just let it rest in room temperature for a few minutes. Now all you have to contemplate on is how you will divide up these slices. I managed about 9 squares... I had some left over ingredients from the base so I used two small oval ramekins as well. But the more the better in this case I say... It all comes down to the size of tin you use. Mind you my slices weren't exactly all consistent in size, the chocolate is slightly delicate to cut but the imperfection of the cuts just makes it look extra rustic and beautiful.


To really indulge myself even more I made a Raw Vanilla Cashew Mylk, and seriously a glass of this mylk with a slice of this Caramel square... is simply heavenly. (The recipe for the "Vanilla Cashew Mylk" will be up in a future blog post.) I had a really awesome birthday thanks to these little squares they were really better than any cake I could have asked for, not to mention they are much healthier. Please let me know if you end up trying this! I would love to know how it goes!!! 

xoxo
Coco


Friday, 6 May 2016

Coconut Goji Bliss Balls Recipe

Hello everyone! I have just recently gotten back from Spain and believe me when I say I have missed my food processor and blender oh so much, I really have. Today I will finally be sharing this recipe and I am super excited for all of you guys to try this one. These little bombs are perfect for a "Pick-me up" or I personally love having one or two with a cup of coffee in hand. They are packed full of protein, healthy fats, and will keep your body energized. I have seriously been meaning to post this recipe much earlier, since these little guys are simply divine.
Now onto the recipe...


Ingredients:

- 1/2 Cup of Almonds
- 1/2 Cup of Walnuts
- 2 Tbsp of Pine Nuts
- 1 Tbsp of Chia Seeds
- 1 Cup of Dates
- 2 Tbsp of Goji Berries
- 1 Tbsp Cacao Nibs
- 1 Tbsp Coconut Oil
- 1/4 Cup of Shredded Coconut

Directions:

1. Place the Almonds, Walnuts, Pine Nuts, Chia Seeds, Goji Berries, Cacao Nibs, and Chia Seeds into a food processor and Pulse well until you reach a crumble like consistency.

2. Next place your Dates (make sure your remove all pits), and Coconut Oil into the food processor.

3. Blend again until your mixture becomes sticky and when you press the mixture it sticks together.

4. Now roll your mixture into little balls and roll them in the Shredded Coconut.

5. Keep them in a container in the fridge for 30 minutes before eating.

* If they don't stick as well add in a couple more dates, or 1 Tbsp of Maple Syrup


This recipe usually makes around 8 to 10 balls, you can easily double or triple the recipe depending on how big your food processor is. For my boyfriend and I we can easily devour the whole batch in one sitting. They are seriously addictive. I absolutely love these little bombs, and I hope you will too! I will be posting other recipe and blog posts soon so be sure to check back soon and let me know how it goes!!!

xoxo
Coco


Thursday, 14 April 2016

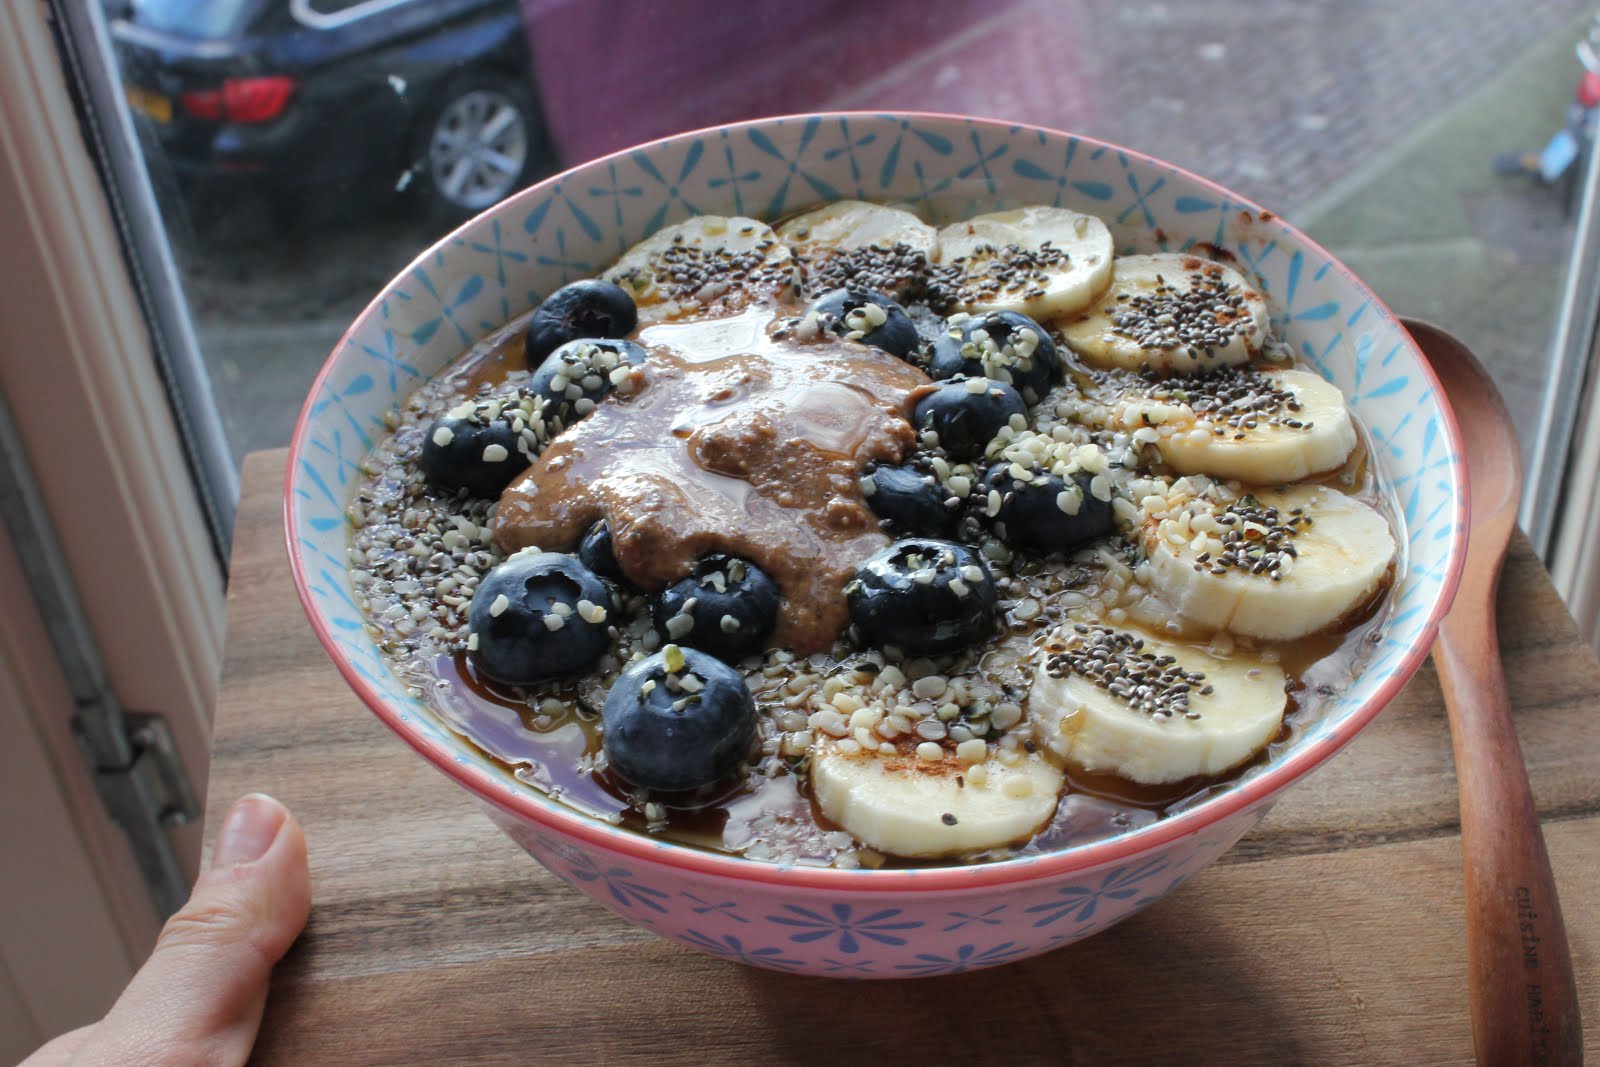
Heart-healthy bowl of Goodness

Good morning everyone! I hope you all are having a wonderful week. The weather has been beautiful the past week. Here in Amsterdam we had a few days where the temperature was 18 degrees, and we were hit with an abundance of sun, which I feel "O so grateful" for. I now write to you on a much less sunnier Thursday where I am at home free of work. On these days where I am free I really like to spoil myself with breakfast. Usually during working days because I mostly active all day I cannot exactly stuff my belly to the point of where my tutu doesn't close. Besides there is absolutely no time for that during work. But work aside on these free days I love to be spoiled and take the time to sit down to a warm bowl of my favourite "Superfood Oatmeal".  Seriously this stuff makes me feel like a princess, its one of those stay in bed and cozy sweaters all day kinda comfort foods, and it is super simple to make.

Ingredients:
- 1 cup Water
- 1/3 cup Oats
- 1/4 cup Coconut Milk
- 1 tsp of Sweetener of choice
- 1/2 ripe banana (mashed)

Topping Ingredients:
- 1 Tbsp Chia Seeds
- 1 Tbsp Hemp Seeds
- 1/2 to 1 Sliced banana
- 1 large handful of Blueberries
- 1 Tbsp of Almond Butter
- 2 Tsp Maple Syrup
- few dashes of Cinnamon 


How To:

1. Start with a small to medium pot, and fill it with a cup of water, bring this water to a boil
2. Add in your 1/3 cup of Oats and let that cook
3. As the Oats cook pour in 1/4 cup of Coconut Milk (Optional)
4. Prepare 1/2 of a smashed ripe banana, and incorporate this into the oats
5. Sweeten with stevia, or coconut sugar, or maple syrup (Optional)
6. Keep stirring
7. Pour into your favourite cozy bowl and now its time to make it awesome

So now that we have our Oatmeal finished, we can really start to have fun... here is where you add all your favourite toppings. The possibilities are seriously endless. I personally love to top it off with some sliced bananas, an abundance of blueberries, a generous sprinkle of chia and hemp seeds, a heaping tablespoon of almond butter,  a drizzle of maple syrup, some goji berries, cocao nibs,  and sprinkles of bee pollen. Ofcourse I don't put all these topping on in one bowl, but these are just some of my personal faves. There is no limit. Oh and don't forget a dash of cinnamon!


With a cup of coffee on the side I'd say Im all set for the morning. I really hope you give this a try, it is super simple, and adjustable to your liking. Enjoy this "heart healthy bowl of goodness" and I send you all lots of love and happiness from my bowl.

xoxo
Coco

Monday, 28 March 2016

Happy Easter!

I guess I've never really celebrated Easter until this year, you see I grew up with Asian parents who never have celebrated this holiday. I do however always think of Easter as that holiday where parents hide eggs for their young ones to find, the supermarkets shelves are fully stocked with chocolate eggs, and there are displays of bunnies almost everywhere one looks. Though Easter has become more of a commercial holiday (just like all the other holidays) it is a holiday to celebrate the resurrection of Jesus Christ from the dead. I am not a Christian, but that does not mean that I don't believe in "God" and it also does not mean that I cannot celebrate Easter, I think everyday is a gift and it should be celebrated as you want. And so after 20 Easter's in my life I have decided this 21st Easter was one where I would celebrate.

To celebrate I decided to make a "Superfood Energy Balls", as a replacement for the traditional supermarket milk chocolate eggs, and I made some Sweet Potato Scones, my own version of those tea time Sunday scones.


Superfood Energy Balls

Both recipes are vegan, so it makes everything taste even just that much more amazing.

For the Sweet Potato Scones, I put a spread of Coconut Oil, and Blueberry Jam on as a filling, but they are really delicious on their own as well.

Sweet Potato Scones
Apart from cooking delicious food I also caught up on some much needed sleep... Happy Easter everyone!!!

xoxo
Coco


Sunday, 24 January 2016

Coco's Happy Pancakes: Pumpkin Banana Love

Happy January everyone! I recently got back from home over in Canada, attempting to blog whilst I was away I decided to fully lounge into the luxury of a holiday, but now that I am back I am super excited to share one of my favourite recipes with you on my blog. This is probably one that I cook most often and one that I get praised for. I have to say I am seriously working on the "Healthy Cooking" concept. I love eating this way, but things don't go right all the time and I believe it takes lots of patience, forgiveness and giggles to get it right, and thats exactly how this pancake recipe worked for me.

I like to call these pancakes "Coco's Happy Pancakes", Ok well I hashtag every picture of the pancakes I make on Instagram with #Coco'sHappyPancakes, but seriously having these as a late brunch on a Sunday morning just makes me super happy. *Oh and I quick side note I have many different variations of these pancakes and I cannot wait to share them all on this blog, but for now I want to share with you these first ones I have made. I started working on this recipe from the beginning of September when the "Squash, Pumpkin" family was just rolling into season, so these lovelies are my Happy(Vegan) Pumpkin Banana Pancakes. *This recipe makes 2 servings.

Ingredients: 
Coco's Happy Pumpkin Pancakes with Buckwheat Granola
- 1 ripe Banana
- 3 Tbsp Pumpkin Purée
- 2 Tsp Vanilla Extract
- 1 Tbsp Chia Seeds
- 1/2 Cup Self Rising Flour
- 1/2 Cup Buckwheat Flour
- 1/4 Cup Oats
- 1 Tsp Baking Powder
- 3 Tbsp Coconut Palm Sugar
- Pinch of Salt
- 1 Tbsp Maple Syrup
- 1/2 Cup Coconut Milk
- 2 Tbsp Raisins (Optional)
- 7 Dashes of Cinnamon
- 1 Tsp Pumpkin Pie Spice


Directions:

1. Start by mixing the Flours, Oats, Baking powder, Sugar, Maple Syrup, Salt, Cinnamon, Pumpkin pie Spice (DRY Ingredients) in a large mixing bowl.

2. Next mash up your 1 super ripe Banana and mix in the Pumpkin Purée in a separate bowl for (WET Ingredients)

3. Add Coconut Milk to the Banana and Pumpkin Mixture (WET Ingredients) and add in your Vanilla Extract, and Chia Seeds. Allow this to sit for around 10 minutes or slightly more.

4. Now pour your WET Ingredients mixture into your DRY bowl, and mix together gently.
* The consistency of the pancake batter should be slightly runny so if it is too stiff add in a Tbsp of Coconut Milk, or Maple Syrup depending on your preference.

5. Now lightly grease your pan with some coconut oil and cook these little guys up!
* Lightly grease, and flip the pancakes once the sides begin to bubble.

I personally love topping off these pancakes with my "Buckwheat Granola" which I will share with you all very soon, and of course fresh Blueberries, Coconut Oil and Maple Syrup. *I am Canadian after all. I hope you all enjoy this recipe and it brings happiness into the new 2016!
xoxo
Coco
Happy Sunday


Sunday, 27 September 2015

What's Happening Coco?

So it has been quite some time… Where has Coco been?

Well I haven't had much time over the past 200 something days as when my last post was. But things and I mean many things have happened… So what has been going on?

Well, I have been changing up my diet, while visiting different places for the summer, and touring with the ballet company and dancing a gala in Italy, heading home for summer holidays, and finally on top of all this I was looking for a new apartment for this new season.  *deep breath*  If some of you may not know I am a professional ballet dancer, I live throughout the year in Amsterdam due to work reasons, and during holidays I visit my home of 13 years in Canada. 

Anyways enough about my past, and a little more about the present, and future?

Diet… Before I decided to take a break from blogging, (I didn't really decide… time was a bit of an issue) I was always feeling quite sluggish, and tired. I depended on coffee a lot of the times, and just wasn't happy with how I was feeling overall. I'd get migraines, or upset stomachs often, and would easily catch any type of viruses that was floating around. With our demanding schedule of dancing around 8 hours a day, well I didn't feel like my body was up to the challenge and I was slowly feeling more fatigue and pain as the season progressed. Along with this because of the "Sluggish" feeling I didn't feel confident in my body and as a ballet dancer it is important to have a "In-shape/fit" figure. I wouldn't say I feel fat, or chubby, but I know my body is made up of what I feed it, and so sometime in April I decided it was time to change up my routine.

So thats whats been up… In the following post I will get into further details of my current diet, and how I made the switch, but for now here is a picture of me dancing and if you guys are interested stay tuned for what really helped me feel my best.

xoxo Coco